Thursday, July 30, 2015

Meet Rustic Drift

If you've been following along, then you can probably tell that I love the following...

b) upcycling
c) reclaimed wood anything
d) the beach

So, it should come to no surprise that I am a big fan of Rustic Drift, a Jersey shore-based husband/wife boutique rental company whose focus is on handmade and upcycled rustic/vintage rentals for events including weddings. 


The really cool part is that the wife of this husband and wife company is my childhood friend Megan!
I've been following her journey as she's posted and shared some of the amazing props and decor that she and her husband Joel have created for all different kinds of venues.
And not only do they run this successful business, they are juggling two little ones with what seems like ease!
Below is just a sampling of some of the work Rustic Drift has done.

I'd take any of these as a cool alternative to an altar:


I love all of these rustic signs and would pay money to have Megan's penmanship:


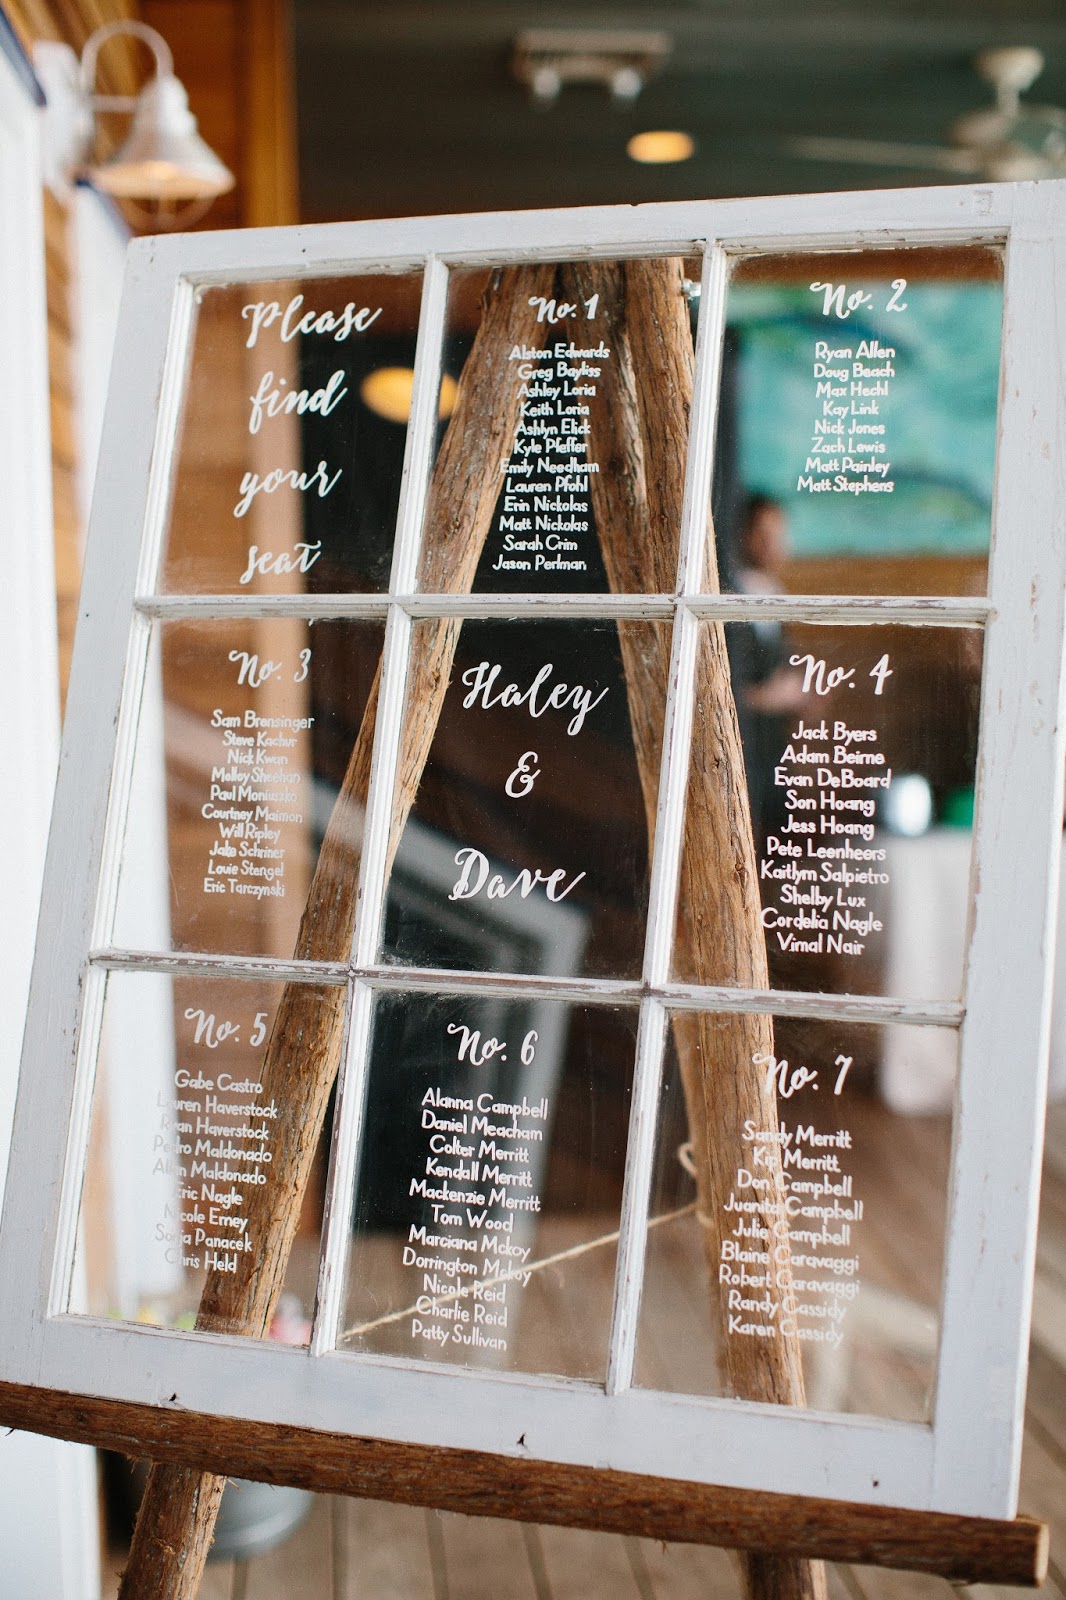
Here are some awesome and clever alternatives to escort cards and paper menus (again...she's killing me with her handwriting!):


Blue and white, lobster, stripes, vintage cans...
...yes, yes, yes, yes!


Some more handmade items for serving up what I think is the most important part of a party (booze and food):


Awesome, right?
It almost makes me want to get married again (operative word: almost, since having our DIY wedding at my parents' house was plenty work and stress).

To see more of Rustic Drift, check out their website here!

- Caitlin


Photo credits: 
Ann Coen Photography (http://www.anncoen.com/)
Amie Schroeder Photography (http://www.amieschroeder.com/)
Dulce Photography (http://dulce-photography.com/)
Saltwater Studios (http://www.saltwaterstudios.net/
and Rustic Drift

Sunday, July 26, 2015

Choosing a chair

Hope you had a good weekend!
A quick post here as I cyber surf for an accent chair for our living room.

Now that we have the sectional couch in there, we need to round off the space with a chair.
I'm not exactly sure what I'm looking for but I am sure that these ones that I've come across on One Kings Lane (all of which are under $500) are pretty awesome (and a few are about to sell out). 
I am also sure that my love for blue and white just grew a little bit more.


(from top, left to right)

one - two - three - four - five - six


A quick thank you to Emily A. Clark for including my made bed (posted on my blog Instagram) as one of her favorites for her #EACstyle challenge

- Caitlin

Friday, July 24, 2015

Easy as 1-2-3 DIY tapestry

I have been having so much fun these past couple of weeks working on setting up the playroom (see here) for our son Charlie, it almost makes me giddy. 
My latest project for this space is this DIY photo tapestry that was so easy to do and makes a big statement.


Here's what I used:


- a photo of Charlie (taken with my iPhone) that I had enlarged to a 18" x 24" poster and ordered through Staples.com (it only cost $17.99!)

- two pieces of scrap wood we had in our garage cut slightly longer than the width of the poster

- stain

- a foam brush (not pictured above)

- thumbtacks

- a hammer

- paracord (that I had but I recently saw for sale at Michaels)

- a hot glue gun (not pictured above)


 I started by staining the wood. 
It just needed one coat.


Then once the stain was dry, I attached the poster to the wood using a hammer and thumbtacks.
I suggest starting in the middle and working your way out to keep the poster straight. Mine is a little bit crooked but not that noticeable. I was going to use a staple gun but was afraid of the staples going all the way through the wood. I suppose you could also use glue.


The last step was attaching the paracord. 
I probably could have attached it with thumbtacks but instead used a hot glue gun.


And that's it!
An easy project that makes a big statement!


Have a great weekend!
- Caitlin

Tuesday, July 21, 2015

Thinking outside of the box (or muffin tin)

I like to switch out the decor on our kitchen table every once and awhile.
It's a tiny table so whatever I put on there, I keep on the smaller more simpler side.
So recently during one of my re-accessorizing moods, I took an old vintage muffin tin (purchased from a garage sale) and decided to re-purpose it to hold flowers on the kitchen table.


Trader Joes has these cute mini flowers so I picked up six of them and they fit perfectly within each tin.


I have a little bit of a black thumb so I'm anticipating that these flowers might not last too long.
If that happens, I can replace them with succulents which are a little easier to keep alive!


To see other things that I've re-purposed, you can visit here, here, here, and here!

- Caitlin

Friday, July 17, 2015

A big look at the built-ins

But today I feel like I can finally share the whole thing, from left to right, top to bottom. 
I'll probably switch out and rotate a few accessories here and there but for the most part, this space is complete. 


I feel like I've talked enough about the saga of these shelves so I'll keep the writing short and sweet and just let the pictures do the talking. 


These DIY doors Chris built to disguise our television (that I posted about before here) made such a difference.


For a source list of where most of the decorative items on the shelf came from, check out the end of this post.


Enjoy your weekend!
- Caitlin

Wednesday, July 15, 2015

The new playroom plans

Last summer I posted about our plans to turn our pump house (you can read about what that is here) into a playroom.


A year later and I'm finally getting the ball rolling on turning this blank space into something fun for our son.


While Charlie has little toy areas all over our house, I would like a space (besides his nursery) that is his. Since we don't have a finished basement to use as a playroom, this space seemed like the best option.

So here's what I've done so far.

I am in the process of making a teepee using this fabric (similar here) which is actually a twin-sized sheet I bought from Home Goods
I plan to follow this DIY tutorial that seems pretty straight forward. 


I also just purchased this neon yellow pom pom trim to use on the opening of the tee pee. 

Etsy

When it's complete, I will definitely share!

For this room, I bought this super affordable rug that I thought was kind of fun and also coordinated with the teepee fabric:


I also recently picked up some metal letters from Michaels to use on the built-ins:


And lastly, I've made some bunting out of craft paper and blue and white paracord:


So, that's the extent of my progress.
There's lots more to do but once I have more of it complete, I will share a bigger look!

- Caitlin